No items found.

8-Week Introduction to Ceramics

A structured introduction to wheel throwing and hand-building. Eight sessions to develop real skills, with clay and glazes provided.

See upcoming dates ↓
Duration
8 weeks
Sessions
3 hrs each
Class size
12 students
Level
All levels
Price
From £340

Eight weeks from clay to kiln

The trade-off with eight weeks is time per technique. Compared to a 12-week course, there's less room to repeat each skill, refine your pieces, or develop personal projects between sessions, but more than the 6-week introduction.

Each session is three hours with the same tutor each week, working through new techniques as a group and then practising at your own pace. By the end of the course you'll have made several pieces across both hand-building and the wheel, plus an introduction to glazing.

The course suits people who want a structured introduction with enough time to practise the basics properly, without committing to twelve weeks. No previous experience needed. Most students arrive having never worked with clay.

Tuition, clay, glazes, and use of studio equipment are included. Firing is the only thing charged separately, at £2.50 per 500g, which works out at around £2 per piece.

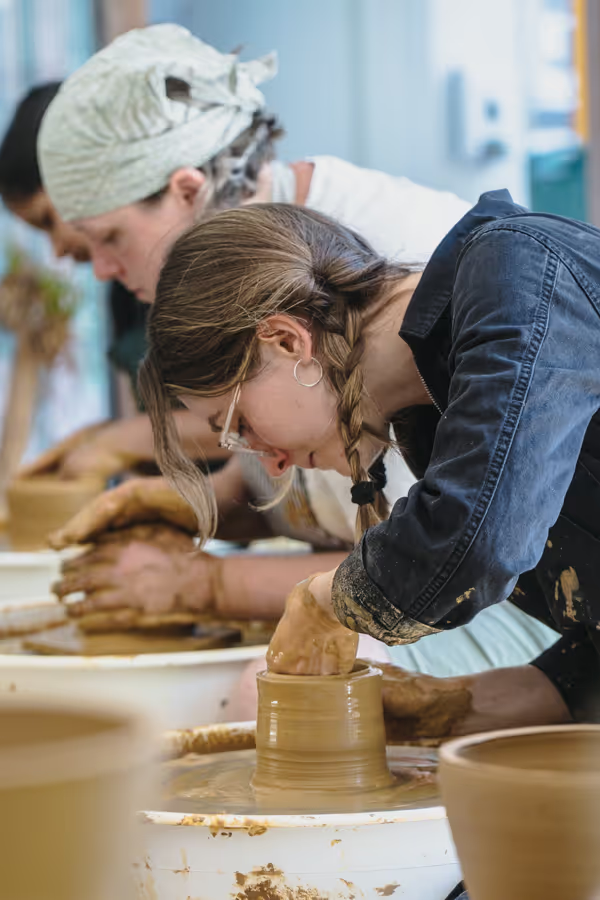
People shaping clay on pottery wheels during a ceramics class or workshop.

What you'll learn, week by week

Each session builds on the last. The course covers both hand-building and the wheel, with time to practise each step before moving on.

Week 1

Getting started

+

Your first session is about getting comfortable with the studio, the clay, and the tools you'll use over the next eight weeks. You'll get an introduction to studio safety, learn how to prepare clay by wedging, and start your first hand-building project using pinching and coiling techniques.

Techniques introduced

Wedging · Studio safety & etiquette · Tools & materials · Pinching

Weeks 2–3

Hand-building foundations

+

Building on the hand-building from week 1, these sessions cover the three core methods: pinching, coiling, and slab building. These techniques are the foundation of all ceramic work and give you a feel for clay as a material before moving onto the wheel.

Techniques introduced

Pinching · Coiling · Slab building · Joining & scoring

Weeks 4–5

Onto the wheel

+

This is where the wheel comes in. You'll learn to centre clay, pull up walls, and shape basic forms: cylinders, bowls, cups. You'll also learn to trim your thrown pieces to refine their shape. There's also time for further hand-building projects, for students with a strong affinity to those techniques.

Techniques introduced

Centring · Cylinders · Cups · Bowls · Trimming & turning · Hump moulds · Pulling handles

Week 6

Final making

+

The last making session before glazing. You'll apply decorative techniques to your pieces and finish any work in progress. Most students use this week to refine their favourite pieces.

Techniques introduced

Decorating with slips · Sgraffito

Weeks 7–8

Glazing & finishing

+

The final two sessions focus on surface and finish. You'll learn to apply glazes, use wax resist for patterns, and prepare your work for the kiln.

Techniques introduced

Glaze application · Wax resist

Surface treatments

Decorative work done before glazing: slip, sgraffito, carving, stamping, or burnishing. These add texture, pattern, or contrast that the glaze then interacts with in the kiln.

Layering

Applying one glaze over another to create a surface different to either glaze alone. The result depends on the chemistry of both glazes and how thickly each is applied.

Advanced glaze application

Glazing methods that go beyond basic dipping. Brushing, pouring, layering, and combining glazes to control where and how the surface develops in the kiln.

Bisque preparation

Getting your pieces ready for their first firing. Final trimming, signing the base, and making sure each piece is bone-dry and crack-free before it goes in the kiln.

Foot rings

The raised ring on the base of a thrown piece. Trimmed from a thicker base once the clay is leather-hard, the foot ring lifts the piece off the surface and gives it a finished underside.

Final trimming

The last pass before bisque firing. Sharpening foot rings, checking wall thickness, and making any last adjustments to the form while the clay is still workable.

Advanced trimming

Trimming complex forms like bottles and vases, where the foot needs to balance a tall or curved body. Done at leather-hard, often with the piece held upside down on a chuck.

Wide-form centring

Centring a larger volume of clay across a wider base than you would for a cylinder or bowl. Harder to feel because the centre of mass sits further from the wheel head.

Throwing batts

Removable wooden or composite discs that fit onto the wheel head. Wide, flat, or fragile forms get thrown on a batt so they can be lifted off without distorting before they've stiffened.

Platters

Larger and lower than plates, with a flat or shallow centre and a defined rim. The wider footprint makes them harder to centre and harder still to lift off the wheel intact.

Plates

One of the hardest forms to throw well. The wider, flatter shape tests your centring and wall control in a different way to cylinders or bowls. Usually thrown on a batt so it can be lifted without warping.

Belly shapes

Forms that swell outward through the middle before tapering at the top. You control the clay's outward curve from the inside, a different challenge to collaring inward.

Bottle shapes

Thrown forms with a narrow neck and wider body. Building one needs control of collaring throughout the throw so the shoulder and neck come out in proportion.

Collaring

Narrowing the opening of a thrown form by squeezing inward as it spins. The technique works against the clay's tendency to widen and is the foundation of bottles, vases, and any enclosed shape.

Glaze introduction

An overview of the glazes we keep in the studio and how to choose ones that suit your work.

Cups

Cups build on the cylinder. Same throwing technique, with extra attention to wall thickness for comfortable handling and a clean rim for drinking.

Wax resist

Applying wax to areas you want to keep glaze-free, creating patterns and contrast between glazed and unglazed surfaces.

Glaze application

Dipping, brushing, and pouring. Each method produces different results. You’ll test on sample tiles before committing to your pieces.

Sgraffito

Scratching through a layer of slip to reveal the clay colour beneath. A simple technique that produces beautiful, graphic results.

Decorating with slips

Coloured liquid clay applied to the surface before firing. You can brush, pour, dip, or trail it for different effects.

Pulling handles

Pulling handles from a lump of clay and attaching them to mugs and jugs. A satisfying skill that takes your thrown work to the next level.

Hump moulds

Using plaster forms to shape consistent pieces. Useful for plates, shallow bowls, and repeatable shapes.

Trimming & turning

Once your thrown pieces have dried slightly, you’ll flip them over on the wheel to refine the shape, add foot rings, and clean up the base.

Bowls

Opening out from a centred lump into wider, shallower forms. Different hand positions and a different feel to cylinders.

Cylinders

The foundation form. Mugs, vases, and tumblers all start as cylinders. You’ll learn to pull walls up evenly and control thickness.

Centring

The essential first step. Getting a lump of clay perfectly steady on a spinning wheel. It takes practice, and your teacher will work with you until it clicks.

Joining & scoring

Scoring, slipping, and assembling separate pieces of clay. The fundamentals of making anything with more than one part.

Slab building

Rolling flat sheets of clay and assembling them into structure. Boxes, planters, angular forms that the wheel can’t produce.

Coiling

Building walls ring by ring for larger forms. You’ll learn to roll consistent coils and join them securely to create pots, vases, and sculptural pieces.

Pinching

The simplest and oldest forming method. You’ll make a small vessel entirely by pinching the clay walls thinner. It teaches you how clay responds to pressure.

Tools & materials

What each tool does and when to reach for it. Ribs, wire cutters, trimming tools, sponges, and more.

Studio safety & etiquette

Dust management, safe use of equipment, kiln protocols, and keeping your workspace clean. We take this seriously because ceramic dust is no joke.

Wedging

Learning to condition clay by hand, pushing, folding, and working it until it’s smooth and free of air bubbles. This is how every session starts.
📦

Your fired pieces will be ready to collect from the studio two to three weeks after the course ends

Upcoming dates and availability

Choose a time and location that works for you. Every 8-week course covers the same curriculum, taught by the same teaching team.

No dates for this course right now

New dates are released regularly. Leave your email and we'll tell you the moment the next one is announced.

Thank you! Your submission has been received!
Oops! Something went wrong while submitting the form.

No spam. Just new dates, roughly once a month.

Looking for something sooner?

View all classes

Arriving on time

Please arrive 10 minutes early.

Each session opens with foundational techniques that everything else builds on. It's hard to catch up if you've missed that groundwork, and disruptive to others once the class is underway.

1

What to bring

An apron, old shoes, pen & paper, a towel.

An apron (synthetic is better than cotton, as it traps less clay dust). Shoes you don't mind getting earthy. A pen and paper for notes, as there's a lot to absorb in the early weeks. A small towel for drying your hands between steps. Clay, glazes, and equipment are all provided. If you booked with the starter toolkit, your tools will be waiting for you. If not, you'll need to bring your own.

2

Clay dust and your health

A genuine concern, not studio fussiness.

Long-term exposure to clay dust can cause silicosis, a serious lung condition. We ask everyone to wipe their work area with a damp sponge throughout the session and mop the floor around their space at the end. Clearing up is part of the session, not an afterthought.

3

Attending your sessions

Get the dates in your calendar before you book.

Please carefully check all the class dates on the course to make sure that you are able to attend all your lessons. Unfortunately, it is not possible to reschedule any missed lessons or join lessons on another course. Our classes run at full capacity and on different lesson schedules.

4

Firing and collecting

Work must enter the queue 3 weeks before your final session.

We fire your pots as they're ready, but the process takes time. Pieces made after the 3-week cutoff can be taken home as bisque (structurally hardened but unglazed). There's a small charge per piece: £2.50 per 500g of unfired clay, paid by card. Finished pieces are available roughly 2 weeks after your final session. We hold student pots for 1 month after the final lesson. Please make sure you collect them before then.

5

If this is your first time

Most people are a little nervous. That's normal.

You won't be the only one. Our instructors are used to working with complete beginners, and there's no performance involved. Just clay, time, and a room full of people in the same position as you. Long hair needs tying back, and long nails will make wheel-throwing noticeably harder.

6

What our students say

Two students on what their 8-week course was actually like.

“Amazing course. Fabulous teacher. Great atmosphere. I wish my pottery achievements had been a bit more sophisticated but talent isn’t everything and that’s what the next course is for! Wonderful teacher, great experience, amazing studio. Can’t wait to do a 12 week course in October with Jonathan in time for Christmas presents!”

Shauna, Leyton, 2026

“Fabulous  learning experience and seeing stages of process so clearly explained.  A warm enthusiasm offered by the tutor and a memorable experience learning and creating. Simona is very enthusiastic tutor and pays individual attention. I really felt more confident than ever handling and creating with clay. I am very pleased to have gained fresh new experience and ways to create ceramics.”

Ismail,Camden Art Centre, 2025

Makers who started here

Each of them signed up for a beginners course with no particular plan to take it any further than that.

Andrea Roman

AR Ceramics

Started on a 12-week course in 2015. Now sells tableware through independent stockists across London and online.

@ar_ceramics

Sayaka Namba

Sayaka Ceramics

Joined as a complete beginner in 2014. Exhibited at the London Design Festival and now supplies restaurants and cafés.

@sayakaceramics

Ben Sutton

Ben Sutton Ceramics

Took his first class in 2015, became a member, and now runs a ceramics practice from his own studio in East London.

@bensuttonceramics

Kat Evans

Kat Evans Pottery

Went from an evening course to a work-exchange position to running her own line of hand-built vessels and planters.

@katevansceramics

Jono Smart

Jono Smart

Began on a beginners course and developed a distinctive style of bold, graphic ceramics now stocked in galleries nationwide.

@jonosmart

After your course

The 8-week course gives you a foundation. Enough to know whether clay is something you want to keep doing.

If you want to keep learning, our 12-week ceramics course covers the same ground over a longer format, with more time to practise and develop your own work. If you'd rather focus on the wheel, our intermediate throwing course covers advanced techniques like collaring, belly shapes, and plates, though it assumes you can already throw confidently.

When you're ready to work independently, studio membership at Hoxton, Leyton, or Highgate gives you access to wheels, kilns, and studio space on a monthly rolling basis. Members work on their own, with technicians on hand for advice and equipment questions.

Book your place